Friday 19 February 2016

The Hallway - The Final Reveal

The day has finally come!  The reveal of the hallway.  It's only been over a year since we started working on it, but good things come to those that wait!


Telephone table from Indigo Furniture. I actually won this in a competition a few years ago, which is  the best (and probably only) competition I've won.  I LOVE it.  
The hanging decorations were gifts on our wedding day, as was the photo frame.  The orchid was a present from the hubby a few years ago which I have managed to keep alive!


The sanded and stained floor and the plush new grey carpet runner.


My lovely bunny prints from HAM, which were gifts from my parents for my last birthday and Christmas.  Black frames, RIBBA from Ikea.


New radiator installed.


New turtle mat to catch dirt on shoes - Christmas gift from my parents. Exciting times when you ask for a doormat for Christmas!


The blind was handmade by me :) 
The light fitting is a HEKTOR from Ikea (was a bit fiddly to fit!)


Yummy floor!


Again, black frames, RIBBA from Ikea (£4 each).  Funny childhood photos, priceless.


New white painted door frames and staircase


The new loft hatch - so smooth!  No more artex!


RIBBA Frame, £7 from Ikea.  Print in frame, printed for free.


Just in case whether you were in any doubt about whether it's an improvement over what we had before!  Here it is in all it's ghastly horror.  Most of these are from moving in day so include the old bathroom too!


I'm so so pleased with how it's turned out

Costs

In terms of costs, I haven't added up every penny, but here are some ball park figures:

Plastering: £780
Paint: £150
Carpet: £90 plus £50 fitting
Blind: £35
Flooring (sanding): £100
Flooring (stain and varnish): £55
New radiator: £90
Under stairs storage: £100
Lighting: £36

Total: ~£1500

Eek! That's a lot of money!  I don't know if we have necessarily added £1500 to the value of the house, but my gosh does it look a heck of a lot better. A lot less unwanted texture!  Apart from the plastering which was a HUGE part of the budget, I really don't think we couldn't have done it any cheaper - we did all the plumbing, sanding, painting, decorating and sewing ourselves!

Which makes it a great time to start a plastering course this weekend - yay!   What have you got planned for the weekend?

Wednesday 17 February 2016

Making a Roman Blind

I'm going to be honest here - I'm not going to attempt to write a full on tutorial here as Sew Helpful have an absolutely amazing one which I followed to the letter to make this blind.  I didn't buy the additional videos, and was just guided through with the free text instructions. Admittedly when I started reading the instructions it didn't make a whole lot of sense, but by the time you got up to that step, it made a lot more sense.

I therefore won't go explanation crazy, but apologies in advance of how picture heavy this post will be!

This was what I started with - it was really hard to photograph as it was so light outside, especially with the snow!  Measure twice, cut once :)


The only space available that I had that was big enough and flat enough to assemble such a blind was the kitchen floor, so after a quick clean, I laid all the fabric out.  (I then realised how creased it was and proceeded to iron it - the photo is the lining fabric pre-iron!)


After ironing the hem allowances, I then carefully measured out the rod pockets and sewed them in.  The alternative is to use rod pocket tape , but I chose to sew my pockets into the lining instead.


The one thing I dislike about sewing is all the ironing involved in it!  It makes such a huge difference though.  This is the first rod pocket in:


Once all the rod pockets were in, it was time to prepare the actual fabric.  This had the hem allowances ironed in.


This bit is hard to explain, but you lay the fabrics wrong side to wrong side, and then the hem allowances roll up together.  When you are ironing the lining fabric it seems a bit backwards, but when you get to this point it all makes sense.  The outer fabric hem really nicely hides the lining fabric hem.

There was so much hand sewing involved, and apart from sewing the rod pockets, nearly all of the rest was hand sewn.  This was so you get a nice finish on the side that you will see, and none of the stitches come through.

I also made a big blooper at this point as I had cut the outer fabric the length that I had noted down for the lining fabric.  The lining fabric is cut longer as you need extra material to make the rod pockets.  Mild moment of panic!  At which point I realised what I had done and breathed a huge sigh of relief!


This is my beautiful sewing machine, which I absolutely LOVE.  It's not fancy, it can't do a bajillion types of stitches, and 99% of the time I just use it for a straight stitch, but I still love it so much.  It was my nan's and she bought it back in the late 70's when my mum was doing sewing at school.  A good 35 years later and it's still going strong.  What a beaut.

This was at the point that I was sewing the velcro to the top of the blind.


I used a wooden baton for the header rather than buying a pre-made kit.  I figured it would be cheaper, but now I've started to add up all the little bits, I don't think it actually is cheaper to do it my way!

It was just a scrap I had lying around the garage, which I covered with the blind fabric using my trusty staple gun.  I then got the other side of the velcro (this side had adhesive on the back), and pressed it on.


There was no chance that the adhesive would hold up the whole blind though, so I stapled it down for good measure.


Next I laid out the finished sewn blind and strung up the back.  Before this point I threaded wooden dowels into the rod pockets, and sewed little hoops at regular intervals to thread the blind cord through.


Next up was putting up the baton.  I enlisted my trusty helper for this one:


I did try doing it solo, but whilst trying to hold the long heavy baton with one hand, mark out where I needed to drill with another, I ended up dropping the bloody thing and making this huge gauge in the newly plastered wall :-o Oh my days - not good news!


Anyway, with the assistance of my trusty helper, we managed to get the baton up above the window.  We used three screws to secure it, one at each end and one in the middle - that seemed sensible enough.


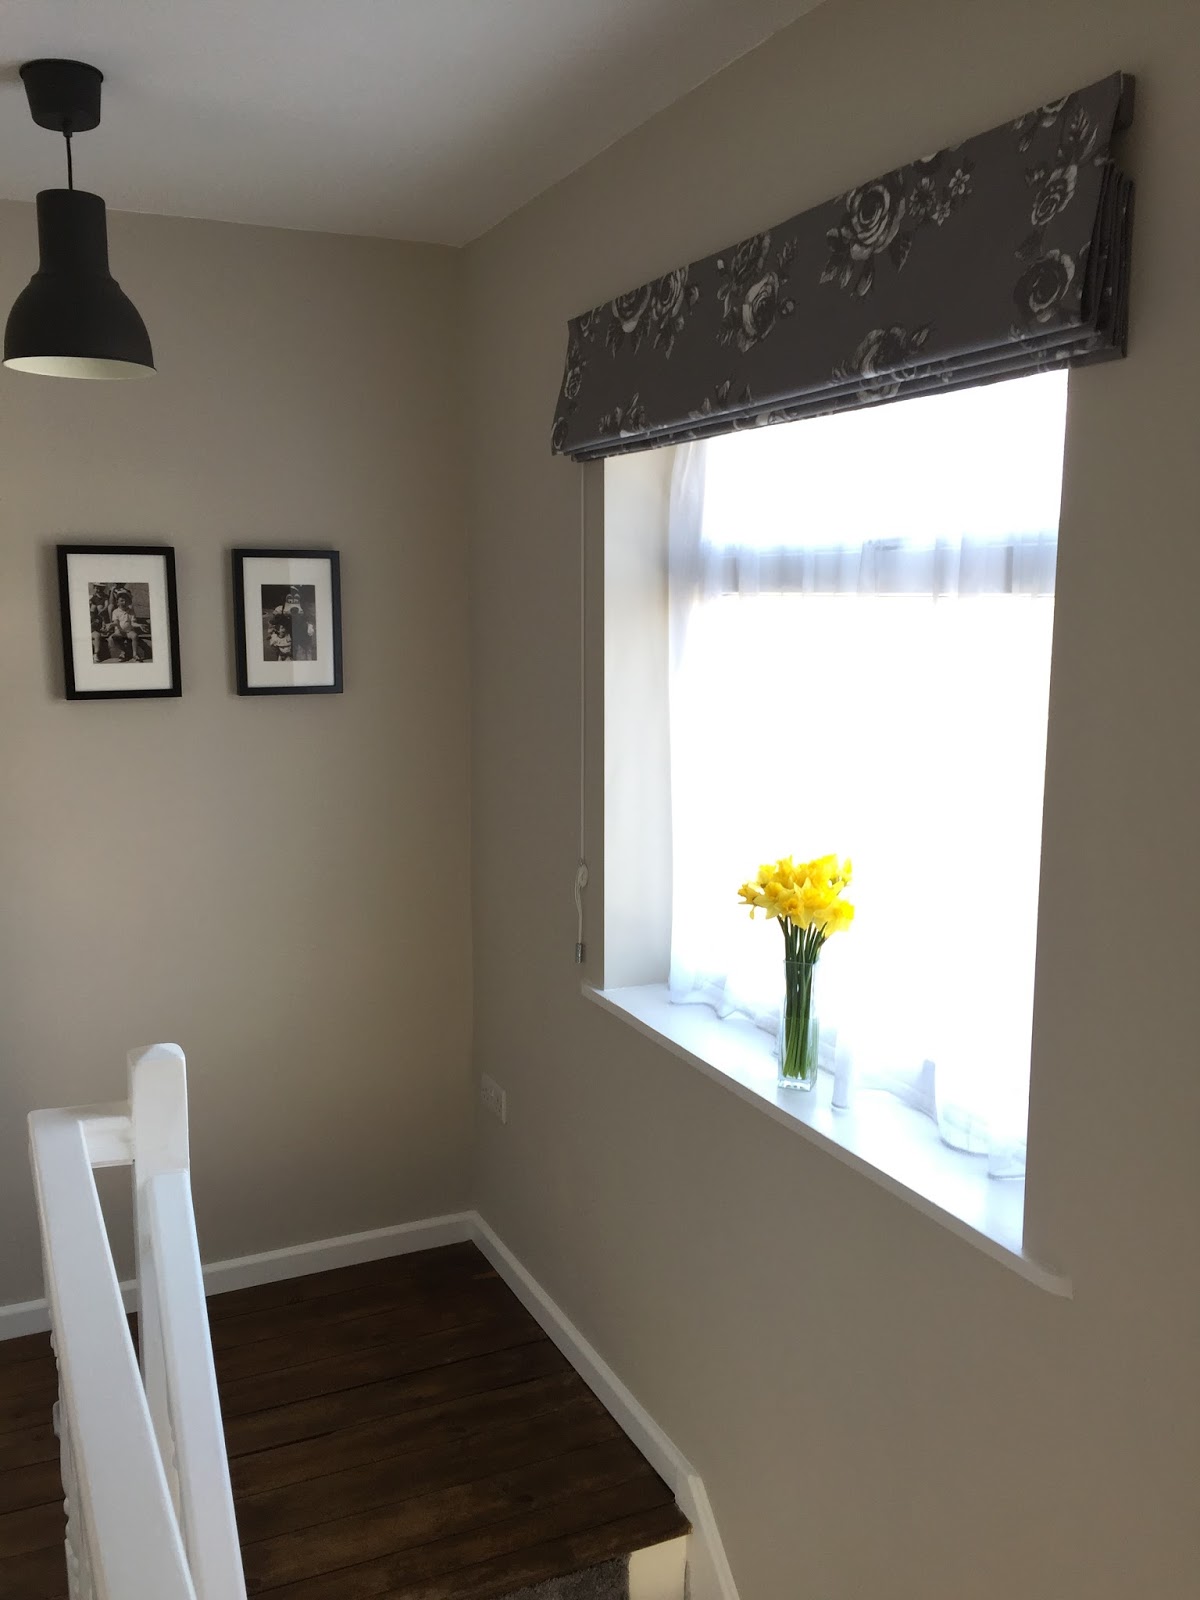
After that was the simple job of velcro-ing the blind to the baton,, and stringing the blind cord through the hooks that were waiting on the baton. Add a little hook on the wall for the secure the blind cord in place, and voila!

It was a thing of pure beauty when the blind glided up a dream and folded up into perfect pleats.  I was so proud of myself.


Total Costs - this was for a window 120cm wide and approx 120 high

Outer Fabric: £9 (IKEA)
Lining Fabric: £5.98 (eBay)
Thread: Free (already owned)
Wooden Baton: Free (Scrap from garage)
Staple Gun & Staples: Free (already owned)
Blind Cord: £4.50 (Local Haberdashery)
Small Plastic Rings: £1.49 (eBay)
Chrome cleat for securing blind cord: £1.90 (eBay)
Chrome Barrel for tying all blind cords together: £2.99 (eBay)
Eye Hooks: £1.49 (eBay)
Sew & Stick Velcro: £5.98 (eBay)

Total Cost: £33.33

Now that I have added it all up, it doesn't seem so bad, but it sure felt like a lot as it kept adding up.

This also doesn't include the first piece of white fabric I bought and then dyed grey.  It didn't really look like grey though and was more blueish - so I ended up giving it away on Freecycle.  It was probably about £10.


What have you done today, to make you feel proud? (Sorry Heather Small, totally borrowing your line there)

Monday 15 February 2016

Motivational Monday - I Can, I Will


Another busy week - every week recently seems to be a busy week!  I have been busy buying supplies this week for our garage roof replacement which is the next job on the never ending list of jobs to do.

This last weekend was also our two year anniversary in the house - my how time flies when you are renovating! (I'm pretty sure that's the saying right?!)  We've certainly come a long way, but still a long way to go yet.

Have a great week!

Wednesday 10 February 2016

Under the stairs storage

The original plan was to box under the stairs in, and to create a functional storage space within. 

We have deviated from that plan, however we have created a much more functional storage area. Let me show you our progress...

This is what we started with. The bit at the top had been covered by a painted piece of wood, but I had far too eagerly ripped that down before I took this photo.


We had stained the floor under the stairs (if you remember, this is where I started to stain to test the strength of the colour) but there was an area, to the bottom left of the photo below, that we were unable to sand. It was black, and every time we went vaguely near it with the sander it just ripped the paper to shreds instantly. As it wouldn't be seen in the grand plan though, we didn't worry ourselves too much about it.


I started by designing the storage. I loved the ALGOT system by IKEA, and it was so flexible that it could easily meet our needs.  I wanted some hanging space for coats, lots of shoe storage, and space for shopping bags and cycling accessories.  

As a woman, you might assume that all that shoe storage might be 90% for me. Well you would be wrong! It turns out I married a man with more pairs of trainers than there are days in the year!  It also has to be 'easy storage' - I loved the idea of shoe racks so that all the shoes are nicely lined up - but I know if there is any effort above minimal to get the item back to its rightful place, it will just end up in a heap on the floor. The solution for the shoes was three large plastic boxes (two for him, and one for me) in which shoes could be put in with very little effort. Not the neatest/best solution for shoe storage, but it's the solution that gives me the best chance of getting a house not littered with shoes!!

I designed the whole system using CAD on my computer - the benefits of being an engineer!  I tweaked and tweaked it, until it looked just right.


I started by sawing out the cross bar that was installed, as I intended to move it higher up.  I wanted to fit a shelf in here, but also the other criteria was that the ironing board had to fit here too underneath the shelf.  Too make the shelf usable, I needed to move this bar up.


I used some scrap bits of wood I had in the garage to make shelf supports (first checking how high I needed them such that the ironing board would fit under).  I did the same on the other side too.


I made a shelf out of two pieces of scrap wood I had in the garage.  The width of the two boards together was almost perfect, I just had to cut the length of them down slightly.  I also had to do a few cut outs from the ends to fit around all the obstacles at the edges, like cable ducting.  I did this mostly with my circular saw, and then finishing with a hand saw.

I also reinstalled the top covering piece of wood, but I had to trim this as it was much too tall.  Again, another easy job for the circular saw.  I screwed this into place to the wood battons on either side.  I decided not to reinstall the cross baton as the sides were more than chunky enough to screw into (that and I only had one bracket and would have needed two to do the job!).


Here is a close up detail of some of the cut-outs.  You can also see that the wood definitely was scrap as I have gotten stain all over it using it as a resting plank for another project!  A bit of sanding with a coarse piece of sandpaper by hand and it came up a treat (or at least a treat enough to paint!)


I additionally used a piece of plywood to board off the bottom section.  This is because the bunnies like to play hide and seek, particularly in this exciting part of the house.  This is also the part of the house that our mains electric cable comes in to the fuse box at bunny height, so I really don't want them munching on it!


A bit of caulk and paint later, and it's looking much cleaner and fresher:


This detail is on the left hand side of the cupboard as you look at it head on, but you would have to crane your head around the corner to see it.  I'm totally in love with the exposed brickwork though - I might need to get some of this going in my next project!


I also installed the Ikea storage system for coats and shoes.  This was very straightforward - you really can;t go wrong with a set of Ikea instructions.


I think ideally I will have a curtain over the ironing board section in time, but I want to make sure it looks right, so I will take my time to source/make the right one.

I changed my mind about boxing this space in, as I thought that if it was boxed in, it would encourage us to open the door, throw our stuff in, and then close the door.  By keeping it open, it encourages us to keep it tidier.

Total Costs for the project:

Shelving in cupboard - scrap wood already owned £0
Wood for cupboard - part of original cupboard £0
Paint for cupboard - bought as part of hallway project
Ikea ALGOT system and plastic boxes ~£100

Total = ~£100

What is the best way you have found to store all of  your coats and shoes?

Monday 8 February 2016

Motivational Monday - Balance


This quote makes me laugh :) I hope it makes you smile too!

This weekend has been a nice easy weekend.  After last weekends hectic few days, I just needed a weekend with no fixed plans that I could pick and choose what I wanted to do when based on how I felt at that particular moment.  So I have plodded on slowly doing lots of small finishing jobs on the hallway so that it really is done.  I had no appetite for a huge project this weekend, so it was the perfect opportunity.  I also swore to myself that I wouldn't start the next project (living room) without first completing the hallway, so it had to be done.

I have also done a bit of shopping this weekend.  I have purchased these lovely chairs from eBay:


I intend to reupholster them in a new fabric, but that won't be until the living room really starts coming together and I know the best colour to go for to complement the scheme.  I have been looking for a while for chairs like these, but it's not that often that they come up in pairs.  I really wanted a matching set of armchairs so I took the plunge.  Can't wait to see what they look like in real life but I don't think that will be for a few weeks as they are coming all the way from Devon! 

I also bought some paint tester's this weekend for the living room.  Some of them as soon as I got them on the wall I knew they weren't right, but Farrow and Ball's Hague Blue is just singing to me.  It was like love at first sight.  


I'm thinking Navy for all of the walls.  Yes, all of 4 of them.  Everyone is telling me I should just do a feature wall and have the rest vaguely beige, but I want to be bold. 

What do you think?  Bold or beige?


Tuesday 2 February 2016

Is it Friday yet?!

Oh my gosh, I am struggling! And it's only Tuesday!

This past week I have been rushed off my feet.  My husband works for a company involved in the crossfit industry and they were running a crossfit competition in London at the weekend.  I helped out too as I was keen to see what the whole thing was about, but it had me manically busy from Thursday straight after work until Sunday evening.  It's then taken me a day or so to take stock and sort the house out, washing etc. that I'm only now starting to feel 'normal' again.  I'm still tired though and the lurgy is going around at work so I feel like that is also taking it's toll.

Which all explains the lack of posts for the last week...

I'm getting super excited for my plastering course which starts on the 20th February, and dreaming of how smooth the walls will be once I'm done :)

I'm also hoping to take finished photos of the hallway this weekend to share with you all.  It's taken me this long as it's always so dark when I'm not at work, that my only real opportunity is the weekends.