Friday 17 May 2013

Rainbow Cake Part 2

So... Part 2.

I got the cakes out the freezer this morning and left them in their wrapping.  By the time I got home from work they were nicely defrosted. I was ready to put it together.

To make the butter icing I probably used about 25 oz of icing sugar, 4oz of flora light, and 4oz of butter. Whizz it all up in the food processor. You can combine it by hand, it just takes a lot longer. 

I trimmed the cakes where required and stuck them together with a very thin layer of buttercream.  


I used a 2D tip in a disposable icing bag (Lakeland -expensive but very good quality), started in the centre of the rose and worked my way out.  It takes a bit of practice but once you get used to it it's pretty straightforward.  Here's the cake half covered:


And now fully done:


I love the fact that the icing looks so innocent and elegant but when you cut inside its going to be so bright! 


As Miranda's mum would say: "such fun!"

I hope my mum enjoys eating it tomorrow :o) 

Not sure I will be baking much over the next couple of weeks as will be focussing my attention on sewing but will be blogging about that too! 

Saturday 11 May 2013

Rainbow Cake part 1

I got cracking this weekend on my mum's birthday cake for next weekend.  I won't have time to make it next weekend so I've made the sponges today which I've frozen, then I will decorate it on Friday night.

Recipe for the sponge:
12 oz self raising flour
12oz caster sugar
12oz soft margarine (I always use flora light, it does wonders)
6 large eggs (the size is important)
1 tsp vanilla extract (not essence, extract is expensive but a bottle lasts ages)
6 food colours (don't go near the liquid ones, paste colours are best - try Sugarflair) - red, orange, yellow, green, blue, purple

You will also need at least one 8" tin but two is ideal.

Preheat your oven to 170 degrees or 150 degrees for a fan oven.

Make sure you weigh your empty bowl before you start and make a note of it.  

Throw all the ingredients into a bowl and mix with an electric hand mixer, or whizz it all up in a food processor or stand mixer.


Once everything is mixed in, weigh your bowl again. Subtract the empty bowl weight from the weight it is now, and divide the remainder by 6, (mine came out to 227.5g). This means that each cake you have will have about 220g (allowing for some stuck to the bowl) of mix in it.

Portion the mix out into 6 bowls and add a small amount of colour to each bowl.  You can always add more so start with a little bit. 


Line the tins with a circle of baking parchment and grease well. 

Pour one mix into each tin, and bake for approx 20 mins until a skewer comes out clean.  If you have two tins bake them next to each other on the same shelf, do not put one under the other as will affect the bake.

Turn out onto a wire rack to cool and remove the grease proof paper circle.


In order to freezer, wait until the cakes are completely cool, then wrap in grease proof paper, wrap well in several layers of cling film, and a final layer of foil. 

To defrost, leave in all the packaging at room temperature.

That's all for now, I will post info and pics of part 2 next weekend.

Friday 10 May 2013

Singer Treadle Sewing Machine Restoration

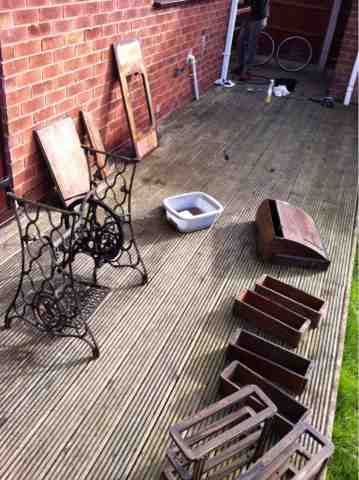
So, I love sewing, and this 100 year old (exactly) beauty caught my eye on preloved:


Now, I doesn't look much now, but I could see it's potential.  Whilst I would love to use the machine itself, I also fancied the table as a possible desk or dressing table.  So I set to work. I disassembled EVERYTHING - taking lots of photos on the way so I could remember how it all went together! 


I then sugar soaped all the wood work and gave it all a good clean.  Next up was a lick of wood primer.  1 coat and it was ready for the good paint :) I chose a Laura Ashley Eggshell paint in Biscuit, a really lovely cream colour.  It took two coats, three in some places like the worktop.


Next up, the iron base.  I issued some Hammerite rust remover gel (available from Halfords) as the base was in a right mess.  I also had used a wire brush prior to this to try and get rid of some of the looser rust. Quickly after I had washed the gel off, I set it out in the sun before getting on with some spray painting so as no flash rust could develop.  It was amazing the difference that even one thin coat of black paint did! Lots of thin coats was definitely the way forward as opposed to one thick coat so it didn't run.

It took me a long time to find some nice drawer knobs that I thought would look right as all but one of the original handles were missing.  I thought I wanted some black cast iron ones to match the base but  in the even I settled for some jazzy gold ones from Wilkinsons (much cheaper than the cast iron ones too!) 


And here is the finished project :) I'm so happy with how it has turned out. I know it's probably a crime to paint these original pieces but the old wood veneer just didn't do it for me.

I also think the machine is beautiful, which is fully functional:


Can't wait to try it out!

Thursday 9 May 2013

Bits and Bobs

The good news is, the yorkshire ale fruit cake went down a treat with the couple who are having it as their wedding cake.  I had made one and let it mature for 5 weeks, and another one and let it mature for 1 week.  We sat down and tried them both at the same time so we could directly compare them.  Now, I'm not a fan of fruit cake myself, but I was pleasantly surprised at how good it was :) The one that had matured for longer was slightly darker and held together a lot better overall - you couldn't taste the beer very much, but that was ok.  The "younger" one had a much crumbier texture and I think the flavour was nice for someone not too fond of fruit cake - it wasn't overly rich.  Both were very moist though which was excellent, and I think that was partly due to the amount of beer that was in the cake, as well as leaving the lining paper (the lining paper used to line the tins when they were baked) on until served.

I have also recently been on a course to learn how to stack cakes - i'm fairly happy with my decorating abilities but stacking (despite being an engineer) was always that one step too far for me.  I attended a course with the lovely Lisa Sims of the Melbourne Cake Decorating Company in Derby and I spent a very enjoyable Sunday covering a stacking a two tier cake.  This was the result:


I have also been practicing my mum's birthday cake too which is in just over a week's time - I've been experimenting on my work colleagues this week.  My mum has requested a rainbow cake which is 6 thin layers of different coloured cake.  I was dead chuffed with my practice run at the cake itself but the icing left a lot to be desired!  I had used a recipe for cream cheese frosting but it was horrendous - much too thin and runny, just a big ol' gloopy mess.  So I think when I make it for real, I will stick to what I know best and use butter cream to ice it instead.  Photos and recipe coming soon!

I also need to tell you all about my vintage treadle sewing machine restoration project, and some of my new sewing projects I have got on the go, but I shall save those for another day :)

That's all for now peeps x

p.s. can't believe it has been two months since my last blog post! I blame Rupert - our new addition to the family (coloquically referred to as Pooper as he likes to poop!)  He's such a cutie :)