Tuesday, 13 October 2015

Hallway Progress - More Paint Stripping and Splash Coat

As I hadn't managed to get all the paint stripping of the architraves done before the plastering was done (see the post about that here), I had to finish it before painting.  I didn't want to run the risk of the emulsion on the wall blistering if I had painted the walls first.


I waited a few weeks for the plaster to be really dry, as I was worried the heat gun might cause it to crack.  It was generally fine, but there was one area which it cracked - eek! :(


I still have more to do around the door stops, I only did the edges next to the plaster, as I'm going to be honest, I was itching to get the paint on the wall!

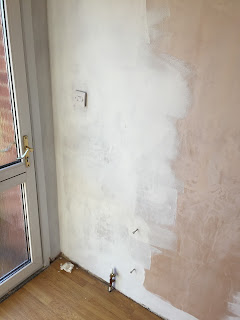
So for fresh plaster, you have to paint on what is called a splash coat.  This is typically a watered-down emulsion coat, as the plaster will be really thirsty.  The plaster drinks in the water and it's a good starter coat before you put your more expensive colour coat on.  I generally use cheap white matt emulsion paint, but you can use any matt emulsion - just make sure you don't use vinyl emulsion.

I probably watered it down 50/50 to start with, so half paint half water.  The paint doesn't always mix well with water though - it takes a while to get it consistently mixed.  I actually used a whisk to get it all mixed - not conventional, but it got the job done!


The 50/50 mix was waaaay too much water!  So this happened...


Then I read the instructions on the paint tin, and it said 20% watered down on fresh plaster.  I measured out the paint to water ratio using a plastic cup and that worked well.

After I got the ratio right it went on much cleaner!


I did all this while the hubby was out so I had to leave the corners that I couldn't get to with the roller on an extension pole.  When he got home we got the ladder out and got those bits done.

I still need to sort the area of the loft hatch out.  I will actually change the loft hatch, but it's the area around it that will need a bit if thought and work.


There was one area of the ceiling down stairs that didn't take the paint too well - I'm not quite sure what was up with the plaster, but I wasn't particularly impressed with it.


Again, some more work required to this patch to sort it out.

What projects are you making progress with?


Monday, 12 October 2015

Friday, 9 October 2015

Paint Delivery

Exciting times!  I ordered this paint on Sunday and it was delivered by hand at about 10am on Monday morning - talk about service!  I ordered from Decorating Warehouse, having no idea this was actually the online presence of the Johnstone's decorating centre just 500m down the road from the house - oops!  Hence it was hand delivered - I don't think this is their regular delivery service - hehe.


Looks like I've got some work to do!  What are you up to this weekend?

Wednesday, 7 October 2015

Hallway Plastering - before and after

The plastering of the hallway was a huge step forward for the hallway.  You can see the first part of the story here.  The ceiling was artex textured and the walls just looked like someone had taken a machine gun and peppered the wall with bullets!


Also, before we had the walls plastered, I took the opportunity to go nuts with paint sample pots to figure out what colour we wanted to paint the final finished walls.  I really loved the idea with painting the walls (or at least one wall) navy blue.  But on balance, I think it will make the room really small, even though the sun pours in in the morning.  I'm coming to have to save this beauty of a colour for another room...  I tried lots of 'vaguely beige' colours with a range from Johnstones and Dulux.  However, what looked like a lot of similar colours on the tester pots, became a mess of browns, lilacs and some really strange colours by the time they got on the wall!  The one that I was drawn to though was Dulux's Egytian Cotton.  I painted it in a few spots around the room, and it was interesting how it looked in different lights even in the same room.

Sorry about the really poor lighting in this photo!  But you get the gist of the colours.


The walls were also covered in cracks, including some quite large ones.  The plasterer suggested putting some fine mesh into the plaster to prevent the cracks propagating through to the surface and prevent them spreading.  It added about £100 to the quote, so I thought it was worth a punt.

This is the mesh being put in:


When it was all completed, I just came home from work and stroked the walls :) haha!  What an exciting life I lead!

(And by 'After', I mean 'Progress'!)


As the plaster was drying out.
I can't wait to get painting!!  What exciting projects have you got lined up?

Tuesday, 6 October 2015

Hallway Progress - Stripping Paint

Before the plastering, I tried to strip as much of the architrave around the doors.  With 7 doors opening into the hallway there was quite a lot to do!  You might ask, why even bother?  We painted them when we first moved in, but because the paint was chipped underneath, the patchiness just showed straight through the paint:


So back to the bare woodwork it was.

Tools I used:

Some parts of the architrave stripped really quickly, other parts were much more stubborn.  The key is to keep the heat moving slightly so it doesn't scorch the wood, then just as it starts to bubble, attack it with the scraping tool!  I damaged the wood in a few places where I tried to scrape it before the paint had softened properly and gouged into the wood instead - oops!  Nothing a bit of wood filler can't fix though.  That's just because I was so impatient!


The wood was then very rough so I sanded it down with my palm mouse sander:


The difficulty I have found, is I'm not quite sure where to stop...! You can see if the picture above I have done all of the wood that is visible from the hallway when the door is closed.  Trouble is if I keep going, I could go on forever with all the woodwork in all the rooms!

I managed to do the bathroom doorway, and started on the spare bedroom doorway, when all of a sudden... the heat gun stopped being hot!  It was still blowing air out but it just wasn't hot.  By the time I had gotten the heat gun exchanged (Screwfix were fab), time was flying and the plastering was imminent, so that was as far as I got before the plasterer came.  To be continued...


Friday, 2 October 2015

Weekend in Dublin

In early August, we had a weekend away in Dublin, or more precisely Dun Loaghaire (pronounced "Dun Leery").  The weather was a really mixed bag - one minute it waas glorious sunshine and baking hot, the next the skies were black and it was pouring it down and howling a gale!  It was a gorgeous place though, with a nice long pier, sea front bars, and a lovely high street with lots of little independent shops and coffee places (as well as some bigger chain stores too).  There was even a cinema!

Here are some of the pictures I took from the sunnier moments:

#maybefiltered

#nofilter. Genuinely


We stayed in an AirBNB place with a family which was also a bit of a mixed bag.  However the home itself was beautifully decorated.  For example, this wallpaper (even though from this post, you all know I hate wallpaper, in particular stripping wallpaper!):

I've no idea where it's from or who makes, but I just appreciated it's beauty.


I just loved how there are bunnies on it!

I was also inspired by the flooring.  It was gorgeous.


So much so as soon as we got home I carefully peeled up the laminate in the hallway to see what I had to work with.  More on that to come soon!

Have you ever found inspiration in an unusual place?